FastAPI--python高性能web框架
FastAPI--python高性能web框架
https://github.com/Paper-Dragon/learn-fastapi
https://www.bilibili.com/video/BV1iN411X72b
第2章 FastAPI介绍和项目准备
2.1 Starlette,Pydantic 与 FastAPI 框架是什么关系?
python的类型提示,基于类型提示type hints
from typing import List
def func(name:str,age:int,l:List):

    print(name,age)
    print(l)
# Python的类型提示使用方法,使用的好能够提高代码的健壮性
Pydantic是一个基于Python类型提示来定义数据验证,序列化和文档(使用JSON模式)库
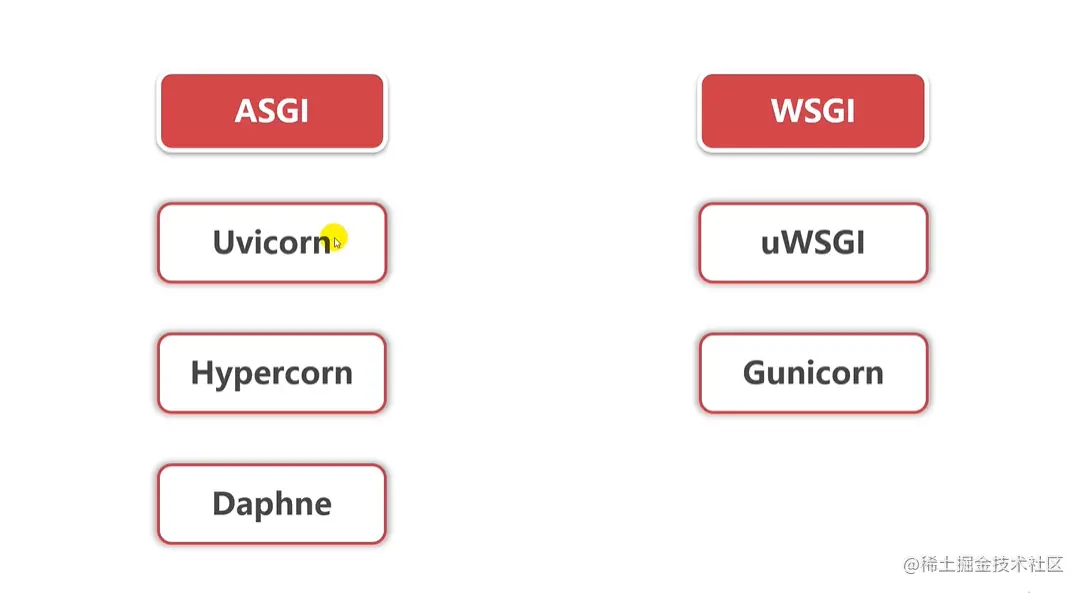
Starlette是一个轻量级的ASGI框架/工具包,是构建高性能Asyncio服务的理想选择

安装环境,python环境必须是3.6以上的,然后去github中将github.com/liaogx/fastapi-tutorial 拷贝下来,安装reqiurements.txt里面的包
一定要注意版本的兼容性
2.2 Pydantic基础教程
Data validation and settings management using python type annotations.
使用Python的类型注解来进行数据校验和settings管理

pydantic enforces type hints at runtime, and provides user friendly errors when data is invalid.
Pydantic可以在代码运行时提供类型提示,数据校验失败时提供友好的错误提示

Define how data should be in pure, canonical python; validate it with pydantic.
定义数据应该如何在纯规范的Python代码中保存,并用Pydantic验证它

from typing import List
from datetime import datetime
from pydantic import BaseModel

# 如果类的属性中有默认值是选填,没有默认值就是必填的
class User(BaseModel):
    id = int
    name: str = "andy"
    signup_list: datetime
    friends: List[int] = []

external_data = {
    "id": 1,
    "signup_list": "2021-02-02 10:10",
    "friends":[1, 2, "3"]
}
user = User(**external_data)
print(user.name)
print(user.friends)
print(repr(user.signup_list))
print(user.dict())  # 以字典的格式输出
print(user.json())  # 以json的格式输出


# class People(User):
#     def start(self):
#         print(f"我的名字{self.name}")
#     def friend(self):
#         print(f"我的朋友们{str(self.friends)}")
#
# people = People(**external_data)
#
# people.start()
# people.friend()
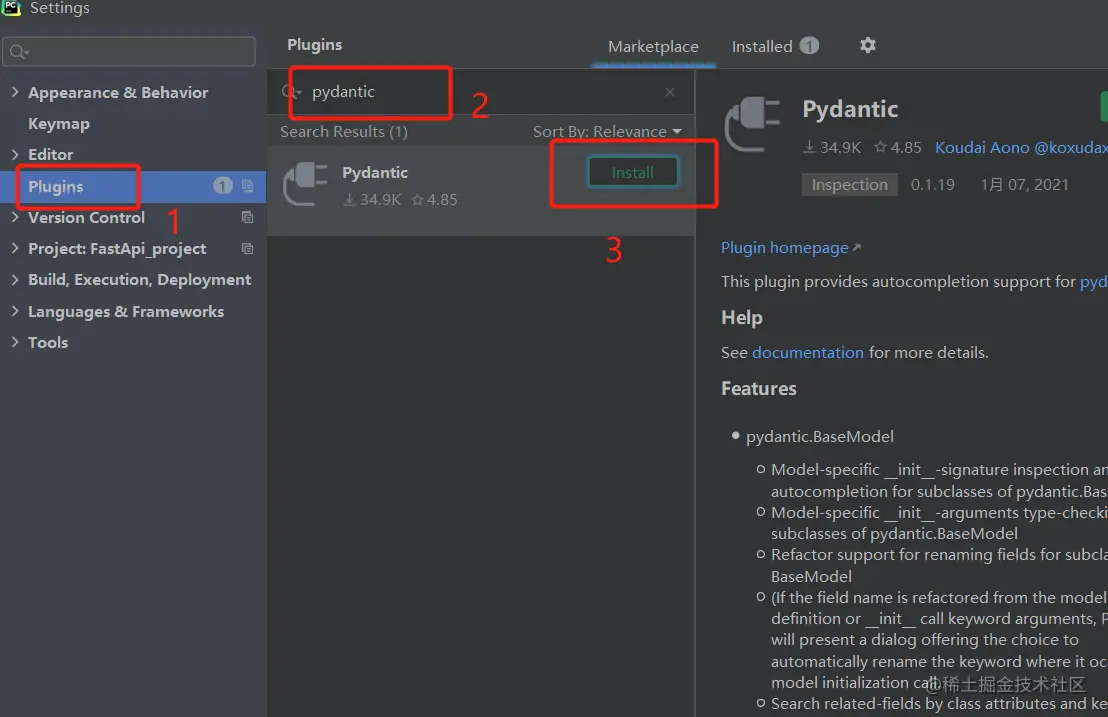
pycharm安装pydantic插件 
校验失败的处理
# 校验失败的处理
try:
    User(id=1,signup_list=datetime.today(),friends=[1,2,'hello world'])
except ValidationError as e:
    print(e.json())
打印的结果
[
  {
    "loc": [
      "friends",
      2
    ],
    "msg": "value is not a valid integer",
    "type": "type_error.integer"
  }
]
模型类的属性和方法
print(user.dict())
print(user.json())
print(user.copy())  # 这里是浅拷贝
print(User.parse_obj(external_data))
print(User.parse_raw('{"id": "123", "signup_ts": "2020-12-22 12:22", "friends": [1, 2, "3"]}'))

path = Path('pydantic_tutorial.json')
path.write_text('{"id": "123", "signup_ts": "2020-12-22 12:22", "friends": [1, 2, "3"]}')
print(User.parse_file(path))

print(user.schema())
print(user.schema_json())

user_data = {"id": "error", "signup_ts": "2020-12-22 12 22", "friends": [1, 2, 3]}  # id是字符串 是错误的
print(User.construct(**user_data))  # 不检验数据直接创建模型类,不建议在construct方法中传入未经验证的数据

print(User.__fields__.keys())  # 定义模型类的时候,所有字段都注明类型,字段顺序就不会乱
递归模型
class Sound(BaseModel):
    sound: str

class Dog(BaseModel):
    birthday: date
    weight: float = Optional[None]
    sound: List[Sound]

dogs = Dog(birthday=date.today(),weight=9.99,sound=[{"sound":"wang wang~"},{"sound": "ying ying ~"}])
print(dogs.json())
执行结果
{"birthday": "2021-02-02", "sound": [{"sound": "wang wang~"}, {"sound": "ying ying ~"}]}ORM模型,从类实例创建符合ORM对象的模型
from sqlalchemy.dialects.postgresql import ARRAY
from sqlalchemy.ext.declarative import declarative_base
from sqlalchemy import Integer, String, Column

Base = declarative_base()

class CompanyOrm(Base):
    __tablename__ = 'companies'
    id =Column(Integer, primary_key=True, nullable=True)
    public_key = Column(String(20), index=True, nullable=False, unique=True)
    name = Column(String(100), unique=True)
    domains = Column(ARRAY(String(255)))


class CompanyModel(BaseModel):
    id: int
    public_key: constr(max_length=20)
    name: constr(max_length=100)
    domains: List[constr(max_length=255)]

    class Config:
        orm_mode = True


co_orm = CompanyOrm(
    id=1,
    public_key="akey",
    name="andy",
    domains=['123.com', '456.com']
)
print(CompanyModel.from_orm(co_orm))
第3章:请求参数和验证
3.1fastapi的简单使用
from typing import Optional
from fastapi import FastAPI
from pydantic import BaseModel

app = FastAPI()


class People(BaseModel):
    id: int
    name: str
    addr: Optional[str] = None


@app.get('/')
async def person():
    return {"name": "hello world"}


@app.get('/city/{city}')
async def result(city: str, query_str: Optional[str] = None):
    return {'city': city, 'query_str': query_str}


@app.post('/person/{person}')
async def result(person: str, city_info: People):
    return {"person": person, "id": city_info.id, 'name': city_info.name, 'addr': city_info.addr}

# 项目的启动
uvicorn 文件名:app --reload

# 接口文档的生成
localhost:8000/docs

# 展示接口的接口
localhost:8000/redoc
3.2 fastApi的结构
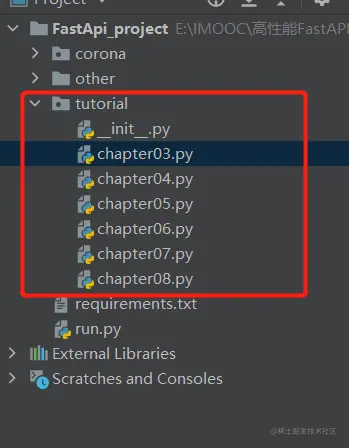
首先创建一个文件包,用于存放各个app 
然后再chapter03.py中实现
from enum import Enum

from fastapi import APIRouter

app03 = APIRouter()
其他app一样的操作
在inif.py文件中
from .chapter03 import app03
from .chapter04 import app04
在run.py文件中
import uvicorn
from fastapi import FastAPI
from tutorial import app03

app = FastAPI()

# 将app的子应用集成进来
app.include_router(app03, prefix='/chapter03', tags=['第三章,请求参数和验证'])


if __name__ == '__main__':
    uvicorn.run('run:app',host='0.0.0.0',port=8000,reload=True,debug=True,workers=1)

from enum import Enum
from typing import Optional, List
from fastapi import APIRouter, Query, Cookie, Header
from pydantic import BaseModel, Field
from datetime import date

app03 = APIRouter()

"""Path Parameters and Number Validations 路径参数和数字验证"""


@app03.get('/path/parameters')
def path_params01():
    return {"message": "This is a message"}


@app03.get('/path/{parameters}')
def path_parameters02(parameters: str):
    return {"message": parameters}


# 枚举
class CityName(str, Enum):
    Beijing = "Beijing china"
    Shanghai = "Shanghai china"


@app03.get('/enum/{city}')
async def latest(city: CityName):
    if city == CityName.Shanghai:
        return {"city_name": city, "confirmed": 1492, "death": 7}
    elif city == CityName.Beijing:
        return {'city_name': city, "confirmed": 971, "death": 9}
    return {"city_name": city, 'latest': "unknown"}


@app03.get('/files/{filepath:path}')
def filepath(filepath: str):
    return f"This file path is {filepath}"


"""Query Parameters and String Validations 查询参数和字符串验证"""


@app03.get('/query')
def page_limit(page: int = 1, limit: Optional[int] = None):
    if limit:
        return {'page': page, 'limit': limit}
    else:
        return {"page": page}


@app03.get('/query/bool/conversion')  # bool类型转换:yes on 1 True true会转换成true, 其它为false
def query_params_validate(query: bool = False):
    return f"返回的数据是{query}"


@app03.get("/query/validations")
def query_params_validate(
        value: str = Query(..., min_length=8, max_length=16, regex="^a"),
        values: List[str] = Query(['V1', 'V2'], alias="alias_name")
):
    return value, values


"""Request Body and Fields 请求体和字段"""


class CityInfo(BaseModel):
    name: str = Field(..., example="Beijing")  # example是注解的作用,值不会被验证
    country: str
    country_code: str = None  # 给一个默认值
    country_population: int = Field(default=800, title="人口数量", description="国家的人口数量", ge=800)

    class Config:
        schema_extra = {
            "example": {
                "name": "Shanghai",
                "country": "China",
                "country_code": "CN",
                "country_population": 1400000000,
            }
        }


@app03.post("/request_body/city")
def city_info(city: CityInfo):
    print(city.name, city.country)  # 当在IDE中输入city.的时候,属性会自动弹出
    return city.dict()


"""Request Body - Nested Nodels 数据格式嵌套的请求体"""


class Data(BaseModel):
    city: List[CityInfo] = None
    date: date
    confirmed: int = Field(ge=0, description="确诊数", default=0)
    deaths: int = Field(ge=0, description="死亡数", default=0)
    recovered: int = Field(ge=0, description="痊愈数", default=0)


@app03.put('/request_body/nested')
def nested_models(data: Data):
    return data


"""如何设置Cookie和Header参数"""


@app03.get("/cookie")  # 这个只能用postman测试,在Header中添加Cookie = cookie_id=xxx
# 定义Cookie参数需要使用Cookie类,否则就是查询参数
def cookie(cookie_id: Optional[str] = Cookie(None)):
    return cookie_id


@app03.get("/header")
def header(user_agent: Optional[str] = Header(None, convert_underscores=True), x_token: List[str] = Header(None)):
    """
    有些HTTP代理和服务器是不允许在请求头中带有下划线的,所以Header提供convert_underscores属性让设置
    :param user_agent: convert_underscores=True 会把 user_agent 变成 user-agent
    :param x_token: x_token是包含多个值的列表
    :return:
    """
    return {"User-Agent": user_agent, "x-Token": x_token}
查询参数总的数据格式校验使用Query--from fastapi import Query
请求体中的参数校验使用Field---from pydantic import Field
使用pandtic来定义请求体数据的时候使用Filed类,
使用路径参数的时候对数据进行校验使用Path类,
对查询参数进行校验的时候使用Query类
第4章 响应处理和FastAPI配置
4-1响应模型示例精讲
from fastapi import BaseModel
from pydantic import EmailStr
from typing import Option,List
"""4.1 Reponse Model响应模型"""


class UserIn(BaseModel):
    username: str
    password: str
    email: EmailStr
    mobile: str = '110'
    address: str = None
    full_name: Optional[str] = None


class UserOut(BaseModel):
    username: str
    email: EmailStr
    mobile: str = '110'
    address: str = None
    full_name: Optional[str] = None


users = {
    "user01": {"username": "user01", "password": "123123", "email": "[email protected]"},
    "user02": {"username": "user02", "password": "123456", "email": "[email protected]", "mobile": "110"}
}


@app04.post("/response_model", response_model=UserOut, response_model_exclude_unset=True)
async def response_model(user: UserIn):
    """response_model_exclude_unset=True表示默认值不包含在响应中,仅包含实际给的值,如果实际给的值与默认值相同也会包含在响应中"""

    print(user.password)
    return users["user02"]


@app04.post(
    "/response_model/attributes",
    response_model=UserOut,  # 指定模型类
    # response_model=Union[UserIn, UserOut],  # 联合两个模型类
    # response_model=List[UserOut],  # 返回结果是一个列表,返回结果包含多个响应模型
    response_model_include=["username", "email", "mobile"],  # 包含哪些字段
    response_model_exclude=["mobile"]  # 过滤掉哪些字段
)
async def response_model_attributes(user: UserIn):
    """response_model_include列出需要在返回结果中包含的字段;response_model_exclude列出需要在返回结果中排除的字段"""
    # del user.password  # Union[UserIn, UserOut]后,删除password属性也能返回成功
    return user
    # return [user, user]
4.2响应状态码和快捷属性
from fastapi import status
"""Response Status Code 响应状态码"""


@app04.post("/status_code", status_code=200)
async def status_code():
    return {"status_code": 200}


@app04.post("/status_attribute", status_code=status.HTTP_200_OK)
async def status_attribute():
    print(type(status.HTTP_200_OK))
    return {"status_code": status.HTTP_200_OK}
4.3表单数据处理
from fastapi import Form, File, UploadFile

"""Form Data 表单数据处理"""


@app04.post("/login/")
async def login(username: str = Form(...), password: str = Form(...)):  # 定义表单参数
    """用Form类需要pip install python-multipart; Form类的元数据和校验方法类似Body/Query/Path/Cookie"""
    return {"username": username}


"""Request Files 单文件、多文件上传及参数详解"""


@app04.post("/file")
async def file_(file: bytes = File(...)):  # 如果要上传多个文件 files: List[bytes] = File(...)
    """使用File类 文件内容会以bytes的形式读入内存 适合于上传小文件"""
    return {"file_size": len(file)}


@app04.post("/upload_files")
async def upload_files(files: List[UploadFile] = File(...)):  # 如果要上传单个文件 file: UploadFile = File(...)
    """
    使用UploadFile类的优势:
    1.文件存储在内存中,使用的内存达到阈值后,将被保存在磁盘中
    2.适合于图片、视频大文件
    3.可以获取上传的文件的元数据,如文件名,创建时间等
    4.有文件对象的异步接口
    5.上传的文件是Python文件对象,可以使用write(), read(), seek(), close()操作
    """
    for file in files:
        contents = await file.read()
        print(contents)
    return {"filename": files[0].filename, "content_type": files[0].content_type}
4.4 FastAPI项目的静态文件配置
# 在run.py中
from fastapi.staticfiles import StaticFiles
# mount表示将某个目录下一个完全独立的应用挂载过来,这个不会在API交互文档中显示
app.mount(path='corona/static',app=StaticFiles(directory='./corona/statuic'),name="static")
4.4 FastAPI项目的静态文件配置
# 在run.py中
from fastapi.staticfiles import StaticFiles
# mount表示将某个目录下一个完全独立的应用挂载过来,这个不会在API交互文档中显示
app.mount(path='static',app=StaticFiles(directory='./corona/statuic'),name="static")
4.5 路径操作配置
@app04.post(
    "/path_operation_configuration",
    response_model=UserOut,  # 指定响应模型
    # tags=["Path", "Operation", "Configuration"],
    summary="This is summary",
    description="This is description",
    response_description="This is response description",
    deprecated=True,  # 表示该接口是否可用
    status_code=status.HTTP_200_OK  # 状态码
)
async def path_operation_configuration(user: UserIn):
    """
    Path Operation Configuration 路径操作配置
    :param user: 用户信息
    :return: 返回结果
    """
    return user.dict()
4.6 FastAPI 应用的常见配置项
# run.py
app = FastAPI(
    title='FastAPI Tutorial and Coronavirus Tracker API Docs',
    description='FastAPI教程 新冠病毒疫情跟踪器API接口文档,项目代码:https://github.com/liaogx/fastapi-tutorial',
    version='1.0.0',
    docs_url='/docs',
    redoc_url='/redocs',
)
4.7 fastapi的异常处理
from fastapi.exceptions import RequestValidationError
from fastapi.responses import PlainTextResponse
from starlette.exceptions import HTTPException as StarletteHTTPException

@app04.get("/http_exception")
async def http_exception(city: str):
    if city != "Beijing":
        raise HTTPException(status_code=404, detail="City not found!", headers={"X-Error": "Error"})
    return {"city": city}


@app04.get("/http_exception/{city_id}")
async def override_http_exception(city_id: int):
    if city_id == 1:
        raise HTTPException(status_code=418, detail="Nope! I don't like 1.")
    return {"city_id": city_id}
第5章:FastAPI的依赖注入系统
5.1 依赖注入系统介绍和使用场景
”依赖注入“是指在编程中,为保证代码成功运行,先导入或声明其所需要的的“依赖”,如子函数,数据库连接等
1 提高代码的复用率
2 共享数据库链接
3 增强安全,认证和角色管理
FastAPI的兼容性
1 所有的关系型数据库,支撑NoSQL数据库
2 第三方的包和API
3 认证和授权系统
4 响应数据注入系统
5.2 创建,导入和声明依赖
我们在Django或者Flask中对于参数的传递使用继承的方式,在FastAPI中我们可以使用声明依赖的方式
函数作为依赖
"""Dependencies 创建 ,导入和声明依赖"""

async def common_parameters(q: Optional[str] = None, page: int = 1, limit: int = 100):
    return {"q": 1, "page": page, "limit": limit}

# 可以在async def中调用def依赖,也可以在def中导入async def依赖
@app05.get('/dependency01')
async def dependency01(commons: dict = Depends(common_parameters)):
    return commons


@app05.get('/dependency02')
def dependency02(commons: dict = Depends(common_parameters)):
    return commons
5.3 如何将类作为依赖性
类作为依赖
fake_itmes_db = [{"item_name": "Foo"}, {"item_name": "Bar"}, {"item_name": "Baz"}, {"item_name": "Andy"}]


class CommonQueryParams:
    def __init__(self, q: Optional[str] = None, page: int = 1, limit: int = 100):
        self.q = q
        self.page = page
        self.limit = limit


@app05.get('/classes_as_dependencies')
async def classes_as_dependencies(commons=Depends(CommonQueryParams)):
    response = {}
    if commons.q:
        response.update({"q": commons.q})
    itmes = fake_itmes_db[commons.page:commons.limit]
    response.update({'items': itmes})
    return response
5.4 自已来的创建和调用
def query(q: Optional[str] = None):
    return q


def sub_query(q: str = Depends(query), last_query: Optional[str] = None):
    if not q:
        return last_query
    return q


@app05.get("/sub_dependency")
async def sub_dependency(final_query: str = Depends(sub_query, use_cache=True)):
    """use_cache默认是True, 表示当多个依赖有一个共同的子依赖时,每次request请求只会调用子依赖一次,多次调用将从缓存中获取"""
    return {"sub_dependency": final_query}
5-5 路径操作装饰器中导入依赖
"""路径操作装饰器中导入依赖"""


async def verify_token(x_token: str = Header(...)):
    if x_token != "fake-super-secret-token":
        raise HTTPException(status_code=404, detail='X-Token header invalid')


async def verify_key(x_key: str = Header(...)):
    """又返回值的子依赖,但是返回值不会被调用"""
    if x_key != "fake-supplier-secret-token":
        raise HTTPException(status_code=400, detail="x_Key header invalid")
    return x_key


@app05.get('/dependency_in_path_operation', dependencies=[Depends(verify_token), Depends(verify_key)])
async def dependency_in_path_operation():
    return {"fuck": "fuck"}
5.6 FastAPI框架中全局依赖的使用
我们不光可以在单个接口中添加依赖,用来验证token护着sercet_key
也可以在子应用中添加
app05 = APIRouter(dependencies=[Depends(verify_token),Depends(verify_key)])也可以在全局app中添加依赖
app = FastAPI(dependencies=[Depends(verify_token),Depends(verify_key)])其实这样就可以对我们的接口进行权限之类的校验了
5.7 使用yield的依赖和子依赖
"""Dependencies with yield 带yield的依赖"""


# 这个需要Python3.7才支持,Python3.6需要pip install async-exit-stack async-generator
# 以下都是伪代码

async def get_db():
    db = "db_connection"
    try:
        yield db
    finally:
        db.endswith("db_close")


async def dependency_a():
    dep_a = "generate_dep_a()"
    try:
        yield dep_a
    finally:
        dep_a.endswith("db_close")


async def dependency_b(dep_a=Depends(dependency_a)):
    dep_b = "generate_dep_b()"
    try:
        yield dep_b
    finally:
        dep_b.endswith(dep_a)


async def dependency_c(dep_b=Depends(dependency_b)):
    dep_c = "generate_dep_c()"
    try:
        yield dep_c
    finally:
        dep_c.endswith(dep_b)
第6章:安全、认证和授权
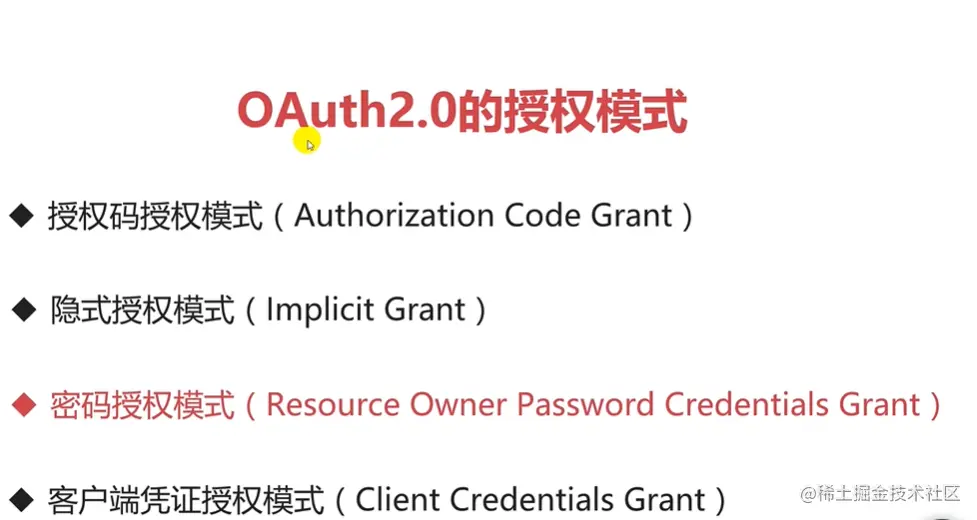
6.1 OAuth2 密码模式和 FastAPI 的 OAuth2PasswordBearer

"""OAuth2 密码模式和 FastAPI 的 OAuth2PasswordBearer"""

"""
OAuth2PasswordBearer是接收URL作为参数的一个类:客户端会向该URL发送username和password参数,然后得到一个Token值
OAuth2PasswordBearer并不会创建相应的URL路径操作,只是指明客户端用来请求Token的URL地址
当请求到来的时候,FastAPI会检查请求的Authorization头信息,如果没有找到Authorization头信息,或者头信息的内容不是Bearer token,它会返回401状态码(UNAUTHORIZED)
"""
oauth2_schema = OAuth2PasswordBearer(tokenUrl="/chapter06/token")


@app06.get('/oauth2_password_bearer')
async def oauth2_password_bearer(token: str = Depends(oauth2_schema)):
    return {"token": token}
6.2 基于 Password 和 Bearer token 的 OAuth2 认证
"""OAuth2 密码模式和 FastAPI 的 OAuth2PasswordBearer"""

"""
OAuth2PasswordBearer是接收URL作为参数的一个类:客户端会向该URL发送username和password参数,然后得到一个Token值
OAuth2PasswordBearer并不会创建相应的URL路径操作,只是指明客户端用来请求Token的URL地址
当请求到来的时候,FastAPI会检查请求的Authorization头信息,如果没有找到Authorization头信息,或者头信息的内容不是Bearer token,它会返回401状态码(UNAUTHORIZED)
"""

oauth2_schema = OAuth2PasswordBearer(tokenUrl="/chapter06/token")  # 请求Token的URL地址 http://127.0.0.1:8000/chapter06/token


@app06.get("/oauth2_password_bearer")
async def oauth2_password_bearer(token: str = Depends(oauth2_schema)):
    return {"token": token}


"""基于 Password 和 Bearer token 的 OAuth2 认证"""

fake_users_db = {
    "john snow": {
        "username": "john snow",
        "full_name": "John Snow",
        "email": "[email protected]",
        "hashed_password": "fakehashedsecret",
        "disabled": False,
    },
    "alice": {
        "username": "alice",
        "full_name": "Alice Wonderson",
        "email": "[email protected]",
        "hashed_password": "fakehashedsecret2",
        "disabled": True,
    },
}


def fake_hash_password(password: str):
    return "fakehashed" + password


class User(BaseModel):
    username: str
    email: Optional[str] = None
    full_name: Optional[str] = None
    disabled: Optional[bool] = None


class UserInDB(User):
    hashed_password: str


@app06.post("/token")
async def login(form_data: OAuth2PasswordRequestForm = Depends()):
    user_dict = fake_users_db.get(form_data.username)
    if not user_dict:
        raise HTTPException(status_code=status.HTTP_400_BAD_REQUEST, detail="Incorrect username or password")
    user = UserInDB(**user_dict)
    hashed_password = fake_hash_password(form_data.password)
    if not hashed_password == user.hashed_password:
        raise HTTPException(status_code=status.HTTP_400_BAD_REQUEST, detail="Incorrect username or password")
    return {"access_token": user.username, "token_type": "bearer"}


def get_user(db, username: str):
    if username in db:
        user_dict = db[username]
        return UserInDB(**user_dict)


def fake_decode_token(token: str):
    user = get_user(fake_users_db, token)
    return user


async def get_current_user(token: str = Depends(oauth2_schema)):
    user = fake_decode_token(token)
    if not user:
        raise HTTPException(
            status_code=status.HTTP_401_UNAUTHORIZED,
            detail="Invalid authentication credentials",
            headers={"WWW-Authenticate": "Bearer"},  # OAuth2的规范,如果认证失败,请求头中返回“WWW-Authenticate”
        )
    return user


async def get_current_active_user(current_user: User = Depends(get_current_user)):
    if current_user.disabled:
        raise HTTPException(status_code=status.HTTP_400_BAD_REQUEST, detail="Inactive user")
    return current_user


@app06.get("/users/me")
async def read_users_me(current_user: User = Depends(get_current_active_user)):
    return current_user


fake_users_db.update({
    "john snow": {
        "username": "john snow",
        "full_name": "John Snow",
        "email": "[email protected]",
        "hashed_password": "$2b$12$EixZaYVK1fsbw1ZfbX3OXePaWxn96p36WQoeG6Lruj3vjPGga31lW",
        "disabled": False,
    }
})
6.3 开发基于 JSON Web Tokens 的认证
"""OAuth2 with Password (and hashing), Bearer with JWT tokens 开发基于JSON Web Tokens的认证"""
SECRET_KEY = "09d25e094faa6ca2556c818166b7a9563b93f7099f6f0f4caa6cf63b88e8d3e7"  # 生成密钥 openssl rand -hex 32
ALGORITHM = "HS256"  # 算法
ACCESS_TOKEN_EXPIRE_MINUTES = 30  # 访问令牌过期分钟


class Token(BaseModel):
    """返回给用户的Token"""
    access_token: str
    token_type: str


pwd_context = CryptContext(schemes=['bcrypt'], deprecated='auto')
oauth2_schema = OAuth2PasswordBearer(tokenUrl='/chapter06/jwt/token')


def verify_password(plain_password, hashed_password):
    """对密码进行校验"""
    return pwd_context.verify(plain_password, hashed_password)


def jwt_get_user(db, username: str):
    if username in db:
        user_dict = db[username]
        return UserInDB(**user_dict)


def jwt_authenticate_user(db, username: str, password: str):
    user = jwt_get_user(db, username)
    if not user:
        return False
    if not verify_password(password, user.hashed_password):
        return False
    return user


def create_access_token(data: dict, expires_delta: Optional[timedelta] = None):
    to_encode = data.copy()
    if expires_delta:
        expire = datetime.utcnow() + expires_delta
    else:
        expire = datetime.utcnow() + timedelta(minutes=15)
    to_encode.update({'exp': expire})
    encode_jwt = jwt.encode(claims=to_encode, key=SECRET_KEY, algorithm=ALGORITHM)
    return encode_jwt


@app06.post('/jwt/token', response_model=Token)
async def login_for_access_token(form_data: OAuth2PasswordRequestForm = Depends()):
    user = jwt_authenticate_user(db=fake_users_db, username=form_data.username, password=form_data.password)
    if not user:
        raise HTTPException(
            status.HTTP_401_UNAUTHORIZED,
            detail="Incorrect username or password",
            headers={"WWW-Authenticate": "Bearer"},
        )
    # 获取Token的过期时间
    access_token_expires = timedelta(minutes=ACCESS_TOKEN_EXPIRE_MINUTES)
    access_token = create_access_token(
        data={"sub": user.username},
        expires_delta=access_token_expires
    )
    return {"access_token": access_token, "token_type": "bearer"}


async def jwt_get_current_user(token: str = Depends(oauth2_schema)):
    credentials_exception = HTTPException(
        status.HTTP_401_UNAUTHORIZED,
        detail="Could not validate credentials",
        headers={"WWW-Authenticate": "Bearer"},
    )
    try:
        payload = jwt.decode(token=token, key=SECRET_KEY, algorithms=[ALGORITHM])
        username = payload.get("sub")
        if username is None:
            raise credentials_exception

    except JWTError:
        raise credentials_exception

    user = jwt_get_user(db=fake_users_db, username=username)
    if user is None:
        raise credentials_exception
    return user


async def jwt_get_current_active_user(current_user: User = Depends(jwt_get_current_user)):
    if current_user.disabled:
        raise HTTPException(status_code=status.HTTP_400_BAD_REQUEST, detail="Inactive user")
    return current_user


@app06.get("/jwt/users/me")
async def jwt_read_users_me(current_user: User = Depends(jwt_get_current_active_user)):
    return current_user
第7章 FastAPI的数据库操作和多应用的目录结构设计
项目结构

7.1 FlastAPI中配置SQLAlchemy数据库操作
# database.py


from sqlalchemy import create_engine
from sqlalchemy.ext.declarative import declarative_base
from sqlalchemy.orm import sessionmaker

SQLALCHEMY_DATABASE_URL = 'sqlite:///./coronavirus.sqlite3'
# SQLALCHEMY_DATABASE_URL = "postgresql://username:password@host:port/database_name"  # MySQL或PostgreSQL的连接方法

engine = create_engine(
    # echo=True表示引擎将用repr()函数记录所有语句及其参数列表到日志
    # 由于SQLAlchemy是多线程,指定check_same_thread=False来让建立的对象任意线程都可使用。这个参数只在用SQLite数据库时设置
    SQLALCHEMY_DATABASE_URL, encoding='utf-8', echo=True, connect_args={'check_same_thread': False}
)

# 在SQLAlchemy中,CRUD都是通过会话(session)进行的,所以我们必须要先创建会话,每一个SessionLocal实例就是一个数据库session
# flush()是指发送数据库语句到数据库,但数据库不一定执行写入磁盘;commit()是指提交事务,将变更保存到数据库文件
SessionLocal = sessionmaker(bind=engine, autoflush=False, autocommit=False, expire_on_commit=True)

# 创建基本映射类
Base = declarative_base(bind=engine, name='Base')
7.2 SQLAlchemy模型类开发
# models.py

from sqlalchemy import Column, String, Integer, BigInteger, Date, DateTime, ForeignKey, func
from sqlalchemy.orm import relationship

from .database import Base


class City(Base):
    __tablename__ = 'city'  # 数据表的表名

    id = Column(Integer, primary_key=True, index=True, autoincrement=True)
    province = Column(String(100), unique=True, nullable=False, comment='省/直辖市')
    country = Column(String(100), nullable=False, comment='国家')
    country_code = Column(String(100), nullable=False, comment='国家代码')
    country_population = Column(BigInteger, nullable=False, comment='国家人口')
    data = relationship('Data', back_populates='city')  # 'Data'是关联的类名;back_populates来指定反向访问的属性名称

    created_at = Column(DateTime, server_default=func.now(), comment='创建时间')
    updated_at = Column(DateTime, server_default=func.now(), onupdate=func.now(), comment='更新时间')

    __mapper_args__ = {"order_by": country_code}  # 默认是正序,倒序加上.desc()方法

    def __repr__(self):
        return f'{self.country}_{self.province}'


class Data(Base):
    __tablename__ = 'data'

    id = Column(Integer, primary_key=True, index=True, autoincrement=True)
    city_id = Column(Integer, ForeignKey('city.id'), comment='所属省/直辖市')  # ForeignKey里的字符串格式不是类名.属性名,而是表名.字段名
    date = Column(Date, nullable=False, comment='数据日期')
    confirmed = Column(BigInteger, default=0, nullable=False, comment='确诊数量')
    deaths = Column(BigInteger, default=0, nullable=False, comment='死亡数量')
    recovered = Column(BigInteger, default=0, nullable=False, comment='痊愈数量')
    city = relationship('City', back_populates='data')  # 'City'是关联的类名;back_populates来指定反向访问的属性名称

    created_at = Column(DateTime, server_default=func.now(), comment='创建时间')
    updated_at = Column(DateTime, server_default=func.now(), onupdate=func.now(), comment='更新时间')

    __mapper_args__ = {"order_by": date.desc()}  # 按日期降序排列

    def __repr__(self):
        return f'{repr(self.date)}:确诊{self.confirmed}例'


""" 附上三个SQLAlchemy教程

SQLAlchemy的基本操作大全
    http://www.taodudu.cc/news/show-175725.html

Python3+SQLAlchemy+Sqlite3实现ORM教程
    https://www.cnblogs.com/jiangxiaobo/p/12350561.html

SQLAlchemy基础知识 Autoflush和Autocommit
    https://zhuanlan.zhihu.com/p/48994990
"""
7.3 Pydantic建立与模型类对应的数据格式类
"""规范数据格式"""
# schemas.py

from datetime import date as date_
from datetime import datetime

from pydantic import BaseModel


class CreateData(BaseModel):
    date: date_
    confirmed: int = 0
    deaths: int = 0
    recovered: int = 0


class CreateCity(BaseModel):
    province: str
    country: str
    country_code: str
    country_population: int


class ReadData(CreateData):
    id: int
    city_id: int
    updated_at: datetime
    created_at: datetime

    class Config:
        orm_mode = True


class ReadCity(CreateCity):
    id: int
    updated_at: datetime
    created_at: datetime

    class Config:
        orm_mode = True
7.4 把创建和查询的函数进行封装
# crud.py


from sqlalchemy.orm import Session
from corona import models, schemas


# 根据id查询城市
def get_city(db: Session, city_id: int):
    return db.query(models.City).filter(models.City.id == city_id).first()


# 根据城市名字查询城市
def get_city_by_name(db: Session, name: str):
    return db.query(models.City).filter(models.City.province == name).first()


# 查询一定数量的城市
def get_cities(db: Session, skip: int = 0, limit: int = 10):
    return db.query(models.City).offset(skip).limit(limit).all()


# 创建城市
def create_city(db: Session, city: schemas.CreateCity):
    db_city = models.City(**city.dict())
    db.add(db_city)
    db.commit()
    db.refresh(db_city)
    return db_city


# 获取数据
def get_data(db: Session, city: str = None, skip: int = 0, limit: int = 100):
    if city:
        return db.query(models.Data).filter(models.Data.has(province=city))
    return db.query(models.Data).offset(skip).limit(limit).all()


# 创建数据
def create_city_data(db: Session, data: schemas.CreateCity, city_id: int):
    db_data = models.Data(**data.dict(), city_id=city_id)
    db.add(db_data)
    db.commit()
    db.refresh(db_data)
    return db_data
7.5 Jinjia2渲染前端页面
main.py
#!/usr/bin/python3
# -*- coding:utf-8 -*-
# __author__ = '__Jack__'

from typing import List

import requests
from fastapi import APIRouter, Depends, HTTPException, BackgroundTasks, Request
from fastapi.templating import Jinja2Templates
from pydantic import HttpUrl
from sqlalchemy.orm import Session

from coronavirus import crud, schemas
from coronavirus.database import engine, Base, SessionLocal
from coronavirus.models import City, Data

application = APIRouter()

templates = Jinja2Templates(directory='./coronavirus/templates')

Base.metadata.create_all(bind=engine)


def get_db():
    db = SessionLocal()
    try:
        yield db
    finally:
        db.close()


@application.post("/create_city", response_model=schemas.ReadCity)
def create_city(city: schemas.CreateCity, db: Session = Depends(get_db)):
    db_city = crud.get_city_by_name(db, name=city.province)
    if db_city:
        raise HTTPException(status_code=400, detail="City already registered")
    return crud.create_city(db=db, city=city)


@application.get("/get_city/{city}", response_model=schemas.ReadCity)
def get_city(city: str, db: Session = Depends(get_db)):
    db_city = crud.get_city_by_name(db, name=city)
    if db_city is None:
        raise HTTPException(status_code=404, detail="City not found")
    return db_city


@application.get("/get_cities", response_model=List[schemas.ReadCity])
def get_cities(skip: int = 0, limit: int = 100, db: Session = Depends(get_db)):
    cities = crud.get_cities(db, skip=skip, limit=limit)
    return cities


@application.post("/create_data", response_model=schemas.ReadData)
def create_data_for_city(city: str, data: schemas.CreateData, db: Session = Depends(get_db)):
    db_city = crud.get_city_by_name(db, name=city)
    data = crud.create_city_data(db=db, data=data, city_id=db_city.id)
    return data


@application.get("/get_data")
def get_data(city: str = None, skip: int = 0, limit: int = 100, db: Session = Depends(get_db)):
    data = crud.get_data(db, city=city, skip=skip, limit=limit)
    return data


def bg_task(url: HttpUrl, db: Session):
    """这里注意一个坑,不要在后台任务的参数中db: Session = Depends(get_db)这样导入依赖"""

    city_data = requests.get(url=f"{url}?source=jhu&country_code=CN&timelines=false")

    if 200 == city_data.status_code:
        db.query(City).delete()  # 同步数据前先清空原有的数据
        for location in city_data.json()["locations"]:
            city = {
                "province": location["province"],
                "country": location["country"],
                "country_code": "CN",
                "country_population": location["country_population"]
            }
            crud.create_city(db=db, city=schemas.CreateCity(**city))

    coronavirus_data = requests.get(url=f"{url}?source=jhu&country_code=CN&timelines=true")

    if 200 == coronavirus_data.status_code:
        db.query(Data).delete()
        for city in coronavirus_data.json()["locations"]:
            db_city = crud.get_city_by_name(db=db, name=city["province"])
            for date, confirmed in city["timelines"]["confirmed"]["timeline"].items():
                data = {
                    "date": date.split("T")[0],  # 把'2020-12-31T00:00:00Z' 变成 ‘2020-12-31’
                    "confirmed": confirmed,
                    "deaths": city["timelines"]["deaths"]["timeline"][date],
                    "recovered": 0  # 每个城市每天有多少人痊愈,这种数据没有
                }
                # 这个city_id是city表中的主键ID,不是coronavirus_data数据里的ID
                crud.create_city_data(db=db, data=schemas.CreateData(**data), city_id=db_city.id)


@application.get("/sync_coronavirus_data/jhu")
def sync_coronavirus_data(background_tasks: BackgroundTasks, db: Session = Depends(get_db)):
    """从Johns Hopkins University同步COVID-19数据"""
    background_tasks.add_task(bg_task, "https://coronavirus-tracker-api.herokuapp.com/v2/locations", db)
    return {"message": "正在后台同步数据..."}


@application.get("/")
def coronavirus(request: Request, city: str = None, skip: int = 0, limit: int = 100, db: Session = Depends(get_db)):
    data = crud.get_data(db, city=city, skip=skip, limit=limit)
    return templates.TemplateResponse("home.html", {
        "request": request,
        "data": data,
        "sync_data_url": "/coronavirus/sync_coronavirus_data/jhu"
    })
home.html
<!DOCTYPE html>
<html lang="en">
<head>
    <title>新冠病毒疫情跟踪器</title>
    <link rel="stylesheet" href="{{ url_for('static', path='/semantic.min.css') }}">
    <script src="{{ url_for('static', path='/jquery-3.5.1/jquery-3.5.1.min.js') }}"></script>
    <script src="{{ url_for('static', path='/semantic.min.js') }}"></script>
    <script>
        $(document).ready(function () {
            $("#filter").click(function () {
                const city = $("#city").val();
                window.location.href = "http://" + window.location.host + "/coronavirus?city=" + city;
            });
            $("#sync").click(function () {
                $.get("{{ sync_data_url }}", function (result) {
                    alert("Message: " + result.message);
                });
            });
        });
    </script>
</head>

<body>
<div class="ui container">
    <h2></h2>
    <h1 style="text-align: center">新冠病毒疫情跟踪器</h1>
    <h2></h2>

    <button id="filter" style="float: left" type="submit" class="ui button alert-secondary">过滤</button>

    <div class="ui input">
        <label for="city"></label><input id="city" type="text" placeholder="城市" value="">
    </div>

    <button id="sync" style="float: right" type="submit" class="ui button primary">同步数据</button>

    <table class="ui celled table">
        <thead>
        <tr>
            <th>城市</th>
            <th>日期</th>
            <th>累计确诊数</th>
            <th>累计死亡数</th>
            <th>累计痊愈数</th>
            <th>更新时间</th>
        </tr>
        </thead>
        <tbody>
        {% for d in data %}
        <tr>
            <td>{{ d.city.province }}</td>
            <td>{{ d.date }}</td>
            <td>{{ d.confirmed }}</td>
            <td>{{ d.deaths }}</td>
            <td>{{ d.recovered }}</td>
            <td>{{ d.updated_at }}</td>
        </tr>
        {% endfor %}
        </tbody>
    </table>
</div>
</body>
</html>
7.6 大型工程木路结构设计-应用文件拆分
from fastapi import APIRouter, Depends, Request

"""【见coronavirus应用】SQL (Relational) Databases FastAPI的数据库操作"""

"""Bigger Applications - Multiple Files 多应用的目录结构设计"""


async def get_user_agent(request: Request):
    print(request.headers["User-Agent"])


app07 = APIRouter(
    prefix="/bigger_applications",
    tags=["第七章 FastAPI的数据库操作和多应用的目录结构设计"],  # 与run.py中的tags名称相同
    dependencies=[Depends(get_user_agent)],
    responses={200: {"description": "Good job!"}},
)


@app07.get("/bigger_applications")
async def bigger_applications():
    return {"message": "Bigger Applications - Multiple Files"}
第八章: 中间件、CORS、后台任务、测试用例
8.1 中间件的概念和开发示例
# run.py

from fastapi import FastAPI, Request
app = FastAPI(
    title='FastAPI Tutorial and Coronavirus Tracker API Docs',
    description='FastAPI教程 新冠病毒疫情跟踪器API接口文档,项目代码:https://github.com/liaogx/fastapi-tutorial',
    version='1.0.0',
    docs_url='/docs',
    redoc_url='/redocs',
)

@app.middleware('http')
async def add_process_time_header(request: Request, call_next):  # call_next将接收request请求做为参数
    start_time = time.time()
    response = await call_next(request)
    process_time = time.time() - start_time
    response.headers['X-Process-Time'] = str(process_time)  # 添加自定义的以“X-”开头的请求头
    return response
8.2 关于资源共享CORS的原理
直白的说就是我们跨站点了,js请求发生冲突或者不允许
8.3 FastAPI的CORSMiddleware实现方式
# run.py
from fastapi.middleware.cors import CORSMiddleware
app.add_middleware(
    CORSMiddleware,
    allow_origins=[
        "http://127.0.0.1",
        "http://127.0.0.1:8080"
    ],
    allow_credentials=True,
    allow_methods=["*"],
    allow_headers=["*"],
)
8.4 FastAPI实现蕾西Celery的后台任务
from typing import Optional

from fastapi import APIRouter, BackgroundTasks, Depends

app08 = APIRouter()

"""【见run.py】Middleware 中间件"""

# 注:带yield的依赖的退出部分的代码 和 后台任务 会在中间件之后运行

"""【见run.py】CORS (Cross-Origin Resource Sharing) 跨源资源共享"""

# 域的概念:协议+域名+端口

"""Background Tasks 后台任务"""


def bg_task(framework: str):
    with open("README.md", mode="a") as f:
        f.write(f"## {framework} 框架精讲")


@app08.post("/background_tasks")
async def run_bg_task(framework: str, background_tasks: BackgroundTasks):
    """
    :param framework: 被调用的后台任务函数的参数
    :param background_tasks: FastAPI.BackgroundTasks
    :return:
    """
    background_tasks.add_task(bg_task, framework)
    return {"message": "任务已在后台运行"}


def continue_write_readme(background_tasks: BackgroundTasks, q: Optional[str] = None):
    if q:
        background_tasks.add_task(bg_task, "\n> 整体的介绍 FastAPI,快速上手开发,结合 API 交互文档逐个讲解核心模块的使用\n")
    return q


@app08.post("/dependency/background_tasks")
async def dependency_run_bg_task(q: str = Depends(continue_write_readme)):
    if q:
        return {"message": "README.md更新成功"}
8.5 后台任务更新
见7.5main.py
8.6 TestClient编写测试用例
from fastapi.testclient import TestClient

from run import app

"""Testing 测试用例"""

client = TestClient(app)  # 先pip install pytest


def test_run_bg_task():  # 函数名用“test_”开头是 pytest 的规范。注意不是async def
    response = client.post(url="/chapter08/background_tasks?framework=FastAPI")
    assert response.status_code == 200
    assert response.json() == {"message": "任务已在后台运行"}


def test_dependency_run_bg_task():
    response = client.post(url="/chapter08/dependency/background_tasks")
    assert response.status_code == 200
    assert response.json() is None


def test_dependency_run_bg_task_q():
    response = client.post(url="/chapter08/dependency/background_tasks?q=1")
    assert response.status_code == 200
    assert response.json() == {"message": "README.md更新成功"}
更新日志
31470-于f2a8d-于392a5-于